PETG is one of the most useful 3D printing materials, but it can also be frustrating when the first layer is not dialed in. If your Creality K2 or K2 Plus turns PETG prints into a stringy spaghetti mess instead of a clean finished part, the fix may be much simpler than changing temperatures, replacing nozzles, or rebuilding your entire slicer profile.
For many Creality K2 owners, the key adjustment is setting a PETG-specific Z-offset in Creality Print. A small 0.15 mm offset can turn failed PETG prints into clean, reliable prints.
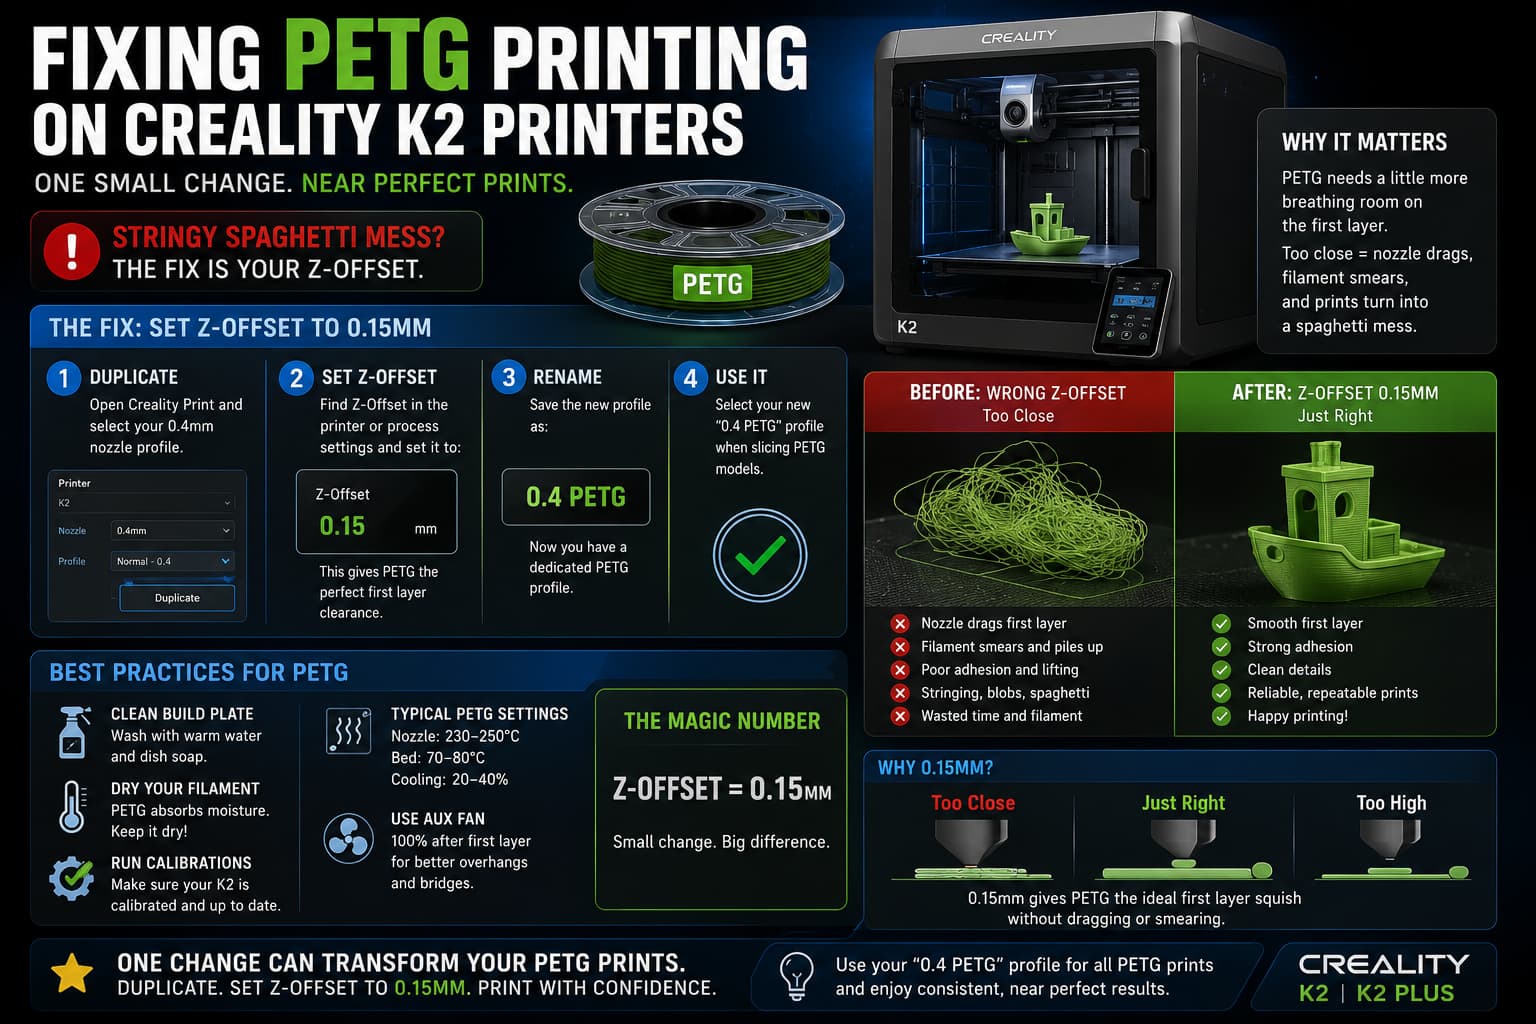
The quick fix
Open Creality Print, duplicate your standard 0.4 mm nozzle profile, and set the Z-offset to:
0.15 mmSave the duplicated profile as:
0.4 PETGThen use that profile any time you slice a PETG model.
That is it. This one setting can make the difference between a print that breaks loose, clumps around the nozzle, or strings into a mess, and a print that starts cleanly and finishes correctly.
Why PETG needs a different first layer
PETG behaves differently than PLA. It is stickier, more flexible, and less forgiving when the nozzle is too close to the build plate. If the nozzle is dragging through the first layer, PETG can bunch up, smear, catch on the nozzle, or get pulled across the bed.
Creality’s own K2 troubleshooting documentation points users toward first-layer causes when prints fail to adhere or the nozzle scrapes the platform. Their checklist includes cleaning the platform, checking calibration, confirming hardware is tight, and fine-tuning Z-offset based on the first-layer result. (Creality Wiki)
Creality’s K2 Plus layer-compression guide also specifically mentions adjusting Z-offset when the first layer appears compressed during printing. (Creality Wiki)
In plain English, PETG often needs just a little more breathing room than PLA. When the nozzle is too close, the filament does not lay down cleanly. Instead of forming a smooth line, it can scrape, curl, stick to the nozzle, or get dragged into the next move.
How to create a PETG profile in Creality Print
The safest way to handle this is not to change your normal PLA profile. Instead, create a dedicated PETG nozzle profile.
In Creality Print, start with your normal 0.4 mm nozzle profile. Duplicate it, then find the Z-offset setting for the printer or process profile. Set the Z-offset to 0.15 mm. Save the duplicated profile as “0.4 PETG” so it is easy to recognize later.
From that point forward, select the 0.4 PETG profile when slicing PETG models. Keep using your normal 0.4 mm profile for PLA or other materials unless they need their own adjustment.
This avoids one of the most common 3D printing mistakes: fixing one filament and accidentally breaking another. PLA, PETG, TPU, ABS, and ASA can all behave differently on the first layer. Keeping PETG in its own profile makes your settings repeatable.
What this fixes
A PETG Z-offset profile can help with several common symptoms:
- PETG turning into stringy spaghetti early in the print
- First layer lines getting dragged by the nozzle
- Filament bunching up around the hotend
- Corners peeling up during the first few layers
- Inconsistent first-layer adhesion
- Prints that start fine, then suddenly turn messy
Creality community discussions around the K2 Plus also show that PETG first-layer behavior is a common pain point, with users discussing Z height, adhesion, and the need for different behavior compared with PLA. (Creality Community Forum)
Do not ignore the basics
The 0.15 mm Z-offset change is the main fix, but it works best when the basics are already handled. Make sure the build plate is clean, the filament is dry, and the printer has completed its normal calibration. PETG can absorb moisture, and wet PETG often prints with popping, stringing, blobs, or weak surfaces.
Also check that the nozzle and hotend are secure. Creality’s K2 troubleshooting guide lists loose hardware, calibration issues, dirty plates, and residual filament as possible first-layer failure causes. (Creality Wiki)
Final recommendation
If your Creality K2 printer handles PLA well but turns PETG into spaghetti, try this before wasting hours on complicated tuning:
Duplicate the 0.4 mm nozzle profile in Creality Print, set the Z-offset to 0.15 mm, save it as “0.4 PETG,” and slice your PETG prints with that profile.
It is a small change that only takes a few minutes, but it can dramatically improve PETG reliability. For many users, this is the difference between constant failed prints and near-perfect PETG results.